Designing and installing a cleanroom, is a major, costly undertaking; the entire process can typically take up to 12 months and can pull in everyone from the MD to the technicians. There are no shortcuts because there is no one-size-fits-all cleanroom. Each will need to factor in different zones, as well as clean down processes, changing areas and packing.
The design process will be under a great degree of scrutiny and it is important to be able to demonstrate ongoing collaboration and forward planning. First-hand knowledge can help to identify issues that might be hard to discern at a conceptual level. This feedback helps to reduce risk factors and can potentially result in operational expense savings.
Future proof the function
There are two schools of thought when it comes to specifying the design; modular and bespoke. The bespoke approach is well-suited to applications where the rigorous hygiene standards and the longer-term use for the cleanroom are unlikely to change or requires the precise placement of furniture and other fittings for risk or operational efficiency.
Some cleanrooms fix furniture into the space permanently – whether to the wall or services under the floor – and often include access to wiring for the lab or production equipment being used.
This offers a ‘showroom’ finish that places equal weight on form and function and is a good alternative for those wanting to use labs and cleanrooms as the ‘shop window’ to their operations.
A spotless and immaculately finished cleanroom is more than a PR exercise though; it demonstrates that your business is committed to quality and control to visitors and auditors alike. That said, a fixed cleanroom design could prove a costly white elephant if business needs to pivot.
In recent years, there has been a trend towards taking a more flexible approach. While a core standard may be applied, such as a common working height or designs to support air flow, this offers a degree of flexibility on the placement of furniture. This ethos plays into requirements to support business growth or future plans for product development.
The modular approach has become more popular. Businesses recognise they need to adapt to new processes or equipment, but also to fit with the changing ways in which cleanrooms are utilised. They may be used for different types of work over the course of their lifetime. Increasingly, the trend for ‘hoteling’ (spaces are shared by multiple teams) means cleanrooms need to be flexible enough to be reconfigured with minimal downtime. A focus on supporting communal spaces means free-standing furniture is by far the most practical option.
Following the staff consultation, it often helps to produce a scaled room layout. This is a practical outline of what goes where and is used to plan where the ‘must-have’ components will be placed and to identify if there is scope for compromise. This helps to establish priorities in specifying furniture and other key equipment and will allow adequate time for the procurement of bespoke items if and where required. Your greatest ally at this point will likely be an Excel spreadsheet.
A 2D flat layout plan supplemented with computer-aided design drawings helps to visualise what the result will look like in an easily digestible form. It is a sensible step to involve the contractors responsible for the installation now, as this can save valuable time as the project develops.
At this point it is worth considering completing a ‘dry run’. A partial set-up helps to bring the concept to life in a way that a 3D design, flow diagram, or even a virtual reality walkthrough would struggle to convey. This allows for any further tweaks or changes to room layouts, furniture specification and process flows to be made. It can also help to establish how the new space will deliver the operational efficiencies intended before too much has been invested.
Once all stakeholders are satisfied with the design concept, and consensus has been reached on the core components, you are in a position to begin procurement. Consult with suppliers early on to help define the optimal products to suit the space and process.
Hygiene check
A good place to start when sourcing hygienic furniture and equipment is to work backwards from the practicalities of the cleaning regime with sterilisation being a key consideration. Getting this option right from the outset is key: using the wrong method will significantly increase the risk of contamination and certainly prolong cleaning procedures.
Once the sterilisation method for the appropriate scenario is chosen – steam, UV light, or chemical – you’re in a better position to make a judgement on what equipment and furniture is a good fit. This decision should be guided by what is sufficiently robust to withstand the chosen sterilisation process.
Stainless steel is a popular option for a cleanroom due to its structure and qualities. Chemically inert, steel is highly durable and easy to clean. As well as being resilient and a safe option from a hygiene perspective, stainless steel is also versatile when it comes to the fabrication process. This makes it a good option if you decide to opt for a bespoke, rather than modular cleanroom design. The 304 grade stainless steel is most commonly used in cleanroom applications and can withstand all but the most rigorous sterilisation processes without corroding: these include thermal (high temperature), mechanical (high bar pressure), and chemical (detergent). It can maintain its structural integrity even at 870°C and chloride content up to 200 mg/l.
Chemical sterilisation is an ever-more popular option for on-site sterilisation, with hydrogen-based vaporised hydrogen peroxide (VHP) being used most commonly in cleanroom applications. This highly aggressive method will dictate what furniture can be used. Look for products built with 316 grade steel, containing more nickel and molybdenum, which can survive chloride contents up to 500 mg/l.
While microbial contamination is unlikely to spike within a controlled environment, bacteria can reproduce very quickly; under optimal conditions a colony will double in size every 20 minutes.
Root cause analysis of swab testing often shows that furniture is a significant risk for contaminants, so there are numerous factors to consider before making any purchase to help manage this.
Be certain the item in question is right for your intended sterilisation option and then check how hygiene is factored into the design itself. Poor design decisions can create an environment that allows microbial life to gain a toehold within a sterile environment. Look out for ‘dirt traps’ such as ledges, gaps, folds, and even raised welds that could collect dirt or even harbour mould.
It is also a great irony that sinks are installed in cleanroom to maintain hygienic standards; They represent some of the most high-risk areas within a facility. Filtering water for all taps is a useful way of managing the risk of biofilm. When assessing sinks and basins ensure there are clear drainage points and be aware of any flat surface(s) that could become oases for microbes.
Consider the practicalities of the cleaning process and how each item would fit into this schedule. The manoeuvrability of the furniture is key in terms of supporting thorough cleaning. For exampe, is it easy to move? Does it offer easy access behind or beneath?
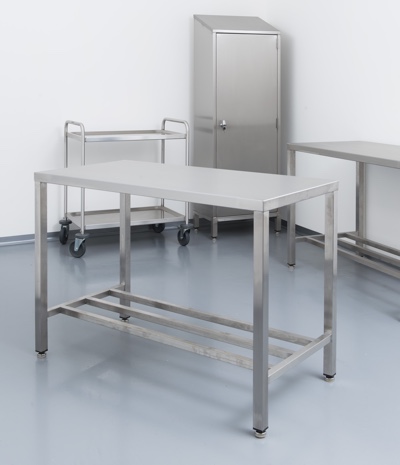
Manoeuvrability of the furniture is key in supporting thorough cleaning
Ideally, aim to buy light-weight furniture that can be easily moved so you can clean each wall and area of floorspace within the cleanroom. Although not viable for every item, also check if an item can be disassembled to run through an autoclave. Investing in intelligently-designed furniture and equipment offers benefits beyond risk management, something as simple as offering greater access can have a big impact on swab results.
Minimise risk
Up to a third of a scientist's day can be taken up by cleaning and/or swab testing, yet there is scope to be authorised to reduce this time. Demonstrating regular conformance with stable results can help promote the case for amending your clean down standard operating procedure. Cleaning regimes are time consuming; it makes sense to minimise risk and avoid rework or further investigation, which will in turn help to reduce operating expenditure and allow focus on other areas of risk management.
The procurement of tables, trolleys, shelving and other support equipment is probably not the most exciting factor to consider. However, when spending so much time and money on a project of this kind it pays to focus on the minutiae. Microbes are not impressed by the finish and form and will find areas to breed on even the most space-age piece of furniture.
Look out for the details; something as small as introducing easy clean tables with no dirt traps, using anti-microbial PVC curtains to separate zones or anti-microbial heads on squeegees can go a long way in demonstrating and providing robust risk management.